Draw a Frame Around Text Box in Powerpoint
This chapter shows you how to work with retrieve-cell's text boxes to rapidly create a circuitous slide layout similar the example from Introduction to layout:

In the following, yous volition larn how to piece of work with call back-prison cell'southward text boxes how to insert, snap, duplicate, delete, motility and change them to build your slide. Afterwards, we will recreate the case above with minimum endeavor using these deportment. Of course, unlike or fifty-fifty more complex layouts are likewise possible, always relying on simple, meaningful deportment defining the relations between elements and making manual placement and resizing unnecessary.
Editing and formatting text in recall-cell's textboxes works simply as it does in PowerPoint. It is important to note, however, that call up-prison cell's text boxes differ from PowerPoint'south text boxes with regard to placement and layout. think-cell'south text boxes do not have a predefined, fixed size or position on the slide from the outset. Instead, they will adjust dynamically when you enter text, insert further elements or move existing ones. In this process, think-prison cell's text boxes always maintain their relations to the other elements on the slide.
remember-cell will automatically position the elements on the slide evenly. This style, you do non take to manually readjust the size and position of every chemical element after each change on the slide.
- 15.1
- Inserting and snapping text boxes
- xv.two
- Duplicating text boxes
- 15.3
- Deleting text boxes
- 15.four
- Moving text boxes
- 15.five
- Unsnapping text boxes or changing snap connections
- 15.half dozen
- Setting the aforementioned size for multiple text boxes
- 15.vii
- Edifice a complex example
- xv.8
- Setting a fixed size or locked position of elements
fifteen.1 Inserting and snapping text boxes
Let's assume that yous starting time from an empty slide. Let's get-go with how to insert text boxes and snap them together:
- Go to the think-cell group in the PowerPoint ribbon and click on

- Click on the slide once to insert your first text box.

The box is automatically centered on the slide. Don't worry if this isn't the position you want the box to announced on your finalized slide. Its position and size will change as yous build your slide, adapting dynamically to entered text or other elements on the slide.
- Start typing to enter text.

- Optionally, click into the box and use recall-prison cell'due south floating toolbar to add some fill color to it.

- Insert some other text box by clicking on the

The two boxes are now snapped together.

Snapped text boxes in recall-cell have the reward that they remain connected through all content and design changes. As you type in your text, the position of the boxes and their alignment is continuously readjusted.
You may have a slide that already has text boxes bundled in rows or columns, and y'all would like to insert another text box to course a table. When yous insert the new box, you can make up one's mind to how many of the existing boxes it should snap:
- Click on the
- Move the mouse cursor towards the row of text boxes on the slide. Note how the orange insertion frame changes depending on the mouse position.
- Click one time to insert the new text box and it snaps together with all iii text boxes below.

As you can see, it'southward easy to form a tabular array past snapping call back-cell's text boxes together. Dissimilar with PowerPoint shapes, the structure of this table is preserved while you add content or change other elements on the slide.
Information technology is also possible to merely snap the outer edges of an inserted text box to existing boxes on the slide. This will identify the new box separately from the others but still maintain the same width for both:
- Click the

- Click and hold down the mouse button every bit the left edge snaps.
- Move your mouse below the right edge of the table until you run across a similar line at that place to which the insertion frame snaps.

- Release the mouse push button.
The outer edges of the new text box are now snapped to the object in a higher place. If the width of any of the two changes, the other volition be resized accordingly.
fifteen.2 Duplicating text boxes
Afterward learning how to insert and snap call back-cell'due south text boxes, let's have a expect at how to duplicate them. There are unlike ways to do this, most of which resemble the options y'all are familiar with from working with PowerPoint shapes:
xv.three Deleting text boxes
If you would like to delete private text boxes or entire rows or columns, just select or multi-select them (see Multi-selection) and hitting the Delete key. Y'all tin can also right-click into the choice and click the red 
15.iv Moving text boxes
At present, allow'southward look at how you tin can movement an existing text box (or a choice of text boxes) to some other position. To do this:
- Left-click on its frame to select it and begin the drag. It is important to click on the frame instead of inside the text box, as that would select the text box content for text editing.

- Click and drag the text box to the new position. Y'all volition see unlike snap targets while you move your mouse.
- When you are happy with the position, release the mouse push to drib and snap the text box there.
You may too use Ctrl+10 and Ctrl+V to move a text box from one position to some other.
Reordering columns in a table is an instance for moving multiple text boxes. You simply select all text boxes in the cavalcade and then drag them to the new position or press Ctrl+X and Ctrl+V then choose the new position.
xv.five Unsnapping text boxes or changing snap connections
After learning how to snap text boxes together in different ways, permit's look at how to unsnap them or change the snap connections. Both can be washed easily. To unsnap a text box:
- Click to select information technology.
- Click on one of the handles.

- Drag away from the other chemical element the box is snapped to and release.

- Repeat this for other edges if necessary.
Yous can likewise change the snap connection by dragging handles to a new snap target. The grey snap indicator lines help yous snap the text box to another position of your choice.

Just release the mouse button once you are happy with the snap position.
15.half dozen Setting the aforementioned size for multiple text boxes
Y'all can select multiple elements and choose 


The elements are resized to make them the aforementioned width.

To return to individual sizes for the text boxes, select one of the text boxes, click on the double-concluded arrow and press Delete or ←.
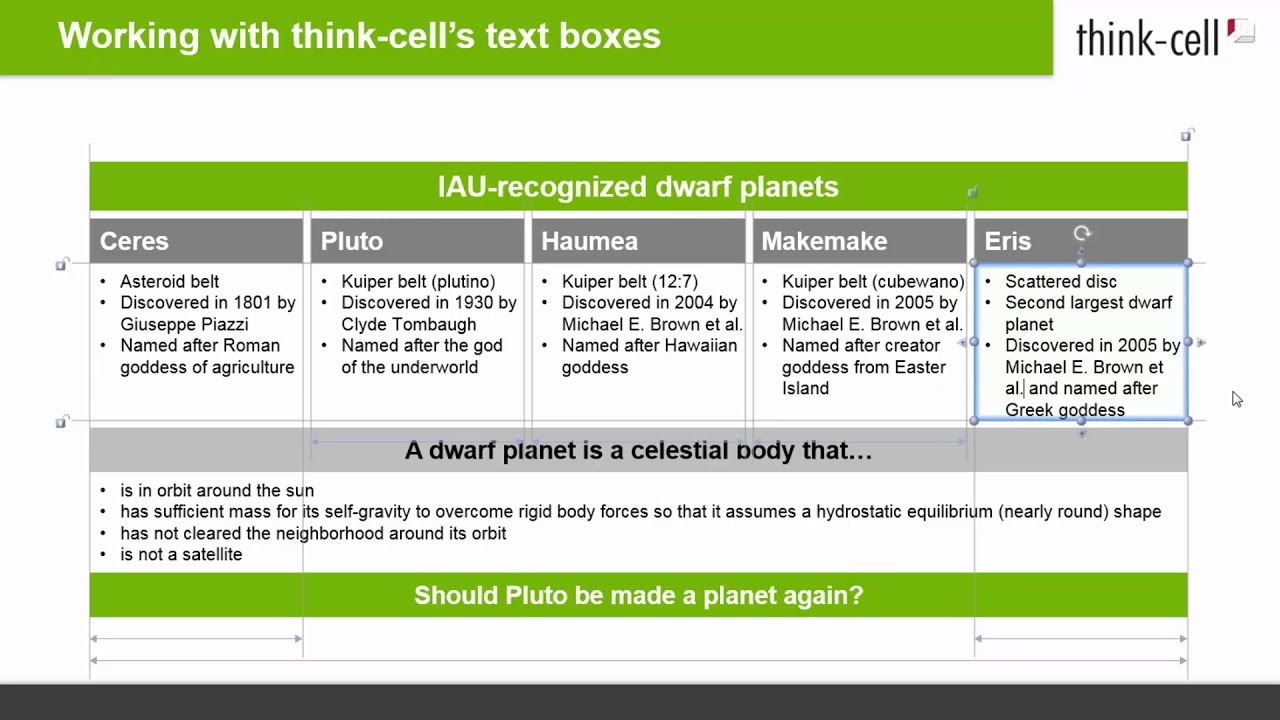
xv.7 Edifice a complex example
The sections above described all the basic interactions with remember-cell'south text-boxes. Equally an case, let'southward make use of them to build a consummate slide with text boxes from scratch that will look similar this:
- Start by inserting your start text box from the ribbon button

Enter the text and choose an appropriate fill colour, if desired. In the following, simply entering text or making formatting changes is not explicitly mentioned betwixt steps anymore.
- Utilise Ctrl-Drag to duplicate the box until you have your desired number of boxes.

- Insert a new text box in a higher place as a heading and snap it to the total width of the five boxes beneath.

- Add boxes beneath the five text boxes with the aid of the


- Insert a separate box below and snap information technology just to the outer edges of the table in a higher place as a sub-heading.

- Now duplicate this box by striking Ctrl+D and snap it below.

- Use PowerPoint's buttons to centre your text in selected boxes.

- Correct-click and drag the topmost box to copy information technology to the very bottom. As you lot can run across, all the positioning of the text boxes is done automatically past call back-jail cell. Not a single box has been moved manually.

- Unsnap some of the text boxes from each other to create a gap between them.

- Finally, multi-select the text boxes with the cavalcade headings, correct-click into the choice and choose

15.8 Setting a fixed size or locked position of elements
Later building up your slide from elements and content, y'all may wish to manually adjust little layout details and set up the final position and dimensions of the elements on your slide. Let's work once more with the example in a higher place. The elements fill the whole slide and are centered on information technology.

As in that location is some infinite between the text boxes, yous may want to tighten the structure a bit by fixing its size, or you lot may want to explicitly leave larger margins by fixing the position.
15.8.i Setting a stock-still size
In PowerPoint you can resize a shape by belongings downwards the Ctrl key and dragging its boundary. You tin can practice the same in call up-cell:
- Select all elements with your mouse.
- Hold down Ctrl, click on the handle in one of the corners, hold downward the mouse button and drag it to constrain the size of your text box structure.

- Release the mouse button.

In that location is less space between the text boxes now, while the whole structure is still centered on the slide.
Instead of choosing the size with Ctrl-dragging, y'all can also enter the size directly:
- Select the chemical element or elements that you wish to resize

- Agree downwardly Ctrl and elevate one of the handles on the blue boundary to set a fixed size.

- Click on the double-ended arrow representing the fixed size

- Enter the desired size into the control.

As units, you tin use points, length units like millimeters or inches, and fractions of the slide height or slide width.

Nosotros recommend that you do not set a fixed size until y'all have added all content to the slide. To reestablish automatic sizing based on your content, click on the double-ended arrow and press Delete or ←.
15.8.2 Locking elements to a position
To exit some margin next to elements, you tin can lock the text boxes to specific positions:
- Select all elements.
- Click on the niggling lock icon in the lesser left corner.

- Hold down the mouse button and drag to the position you want the lower edge of the element structure to exist.

- Release the mouse button to shut the lock and fix the elements into position.
- Repeat this for the left, right or upper margin if necessary.

We recommend that you practise not lock your text boxes until you have added all content to the slide. To open a lock and reestablish the automatic positioning, simply click one time onto the closed lock. Repeat this for other airtight locks if needed.
Source: https://www.think-cell.com/en/resources/manual/textbox.html